새 프로젝트를 만들어 EntityManager 사용하는 방법을 공부해보자.
1. domain
isLove와 같은 동적인 boolean 데이터는 DB에 넣을 수 없다.
게시글을 좋아하는지 아닌지는 로그인하는 사람마다 다르기 때문에 체크를 해줘야 한다.
좋아한다, 안 한다는 정보는 DB에 넣지 않고 데이터를 넣어야 한다.
DB에는 데이터를 넣어두고 정보화 해야한다.
package site.metacoding.entitytest.domain;

import javax.persistence.GeneratedValue;
import javax.persistence.GenerationType;
import javax.persistence.Id;

public class Board {
    @Id
    @GeneratedValue(strategy = GenerationType.IDENTITY)
    private Integer id;

    private String title;
    private String content;

    // private boolean isLove;
}
2. Repository
SELECT를 하기 위해서는 repository가 필요한데
JPARepository를 만들지 않고 우리가 repository를 만들 것이다.
JPQL 라이브러리를 사용해서!!
이 repository는 메모리에 뜨지 않기 때문에 @Repository 어노테이션을 붙여줘야 한다.
@Repository
public class BoardJPQLRepository {

}
기본적으로 JPA가 제공해주는 repository도 사용할 것이다.
편하니까!
package site.metacoding.entitytest.domain;

import org.springframework.data.jpa.repository.JpaRepository;

public interface BoardRepository extends JpaRepository<Board, Integer> {
    // jpaRepository는 interface임 기본적인 CRUD를 제공해줌, @Repository가 내부적으로 붙어있음
    // interface 구현되지 않은 추상 메서드를 갖고있음 -> implements 구현하겠다!
}
언제는 JPARepository를 사용하고, 언제는 BoardJPQLRepository를 사용하고
구분해서 사용해야 하면 불편하겠다.
하나로 사용할 수 있게 만드는 방법 없을까?
대체 어떤 식으로 구조를 만들어야 하나의 repository만 바라볼 수 있을까 ㅠㅠ?
Impl을 사용해 만들 수 있다.
Impl은 implementation을 의미하며 구현한 인터페이스(구현체)임을 말한다.
interface는 구현되지 않은 인터페이스이다.
보통 인터페이스는 추상 메서드를 가지고 있기 때문이다.
그래서 클래스에 인터페이스를 상속받으면 implements를 붙여주는 것이다.
추상 메서드를 실제 메서드로 구현하겠다고!
그래서 인터페이스를 상속하는 애들을 보통 이름에 Impl이라고 붙여준다.
다음과 같이 인터페이스에 추상 메서드를 만들어 구현한다.
package site.metacoding.entitytest.domain;

import java.util.List;

import org.springframework.stereotype.Repository;

import site.metacoding.entitytest.web.dto.BoardDetailRespDto;

@Repository
public interface BoardJPQLRepository {
    BoardDetailRespDto mFindDetail(Integer id);

    List<BoardDetailRespDto> mFindAll();

    List<BoardDetailRespDto> mFindAllQLRM();
}
그 다음 추상 메서드를 해당 메서드를 가진 Repository를 상속시켜주고 실제로 구현해줄 class를 만들어준다.
package site.metacoding.entitytest.domain;

import java.util.ArrayList;
import java.util.List;

import javax.persistence.EntityManager;
import javax.persistence.Query;

import org.qlrm.mapper.JpaResultMapper;

import lombok.RequiredArgsConstructor;
import site.metacoding.entitytest.web.dto.BoardDetailRespDto;

@RequiredArgsConstructor
public class BoardJPQLRepositoryImpl implements BoardJPQLRepository {
    // interface는 변수가 전부 static이라 변수를 만들수가 없다.
    private final EntityManager em;
}
무조건 상속받은 class의 이름 끝에는 Impl이 들어가야
스프링에서 Impl로 인식하고 실행이 된다는 점에 주의하자!!
Impl을 중간에 넣거나 빼버리면 오류가 발생한다.
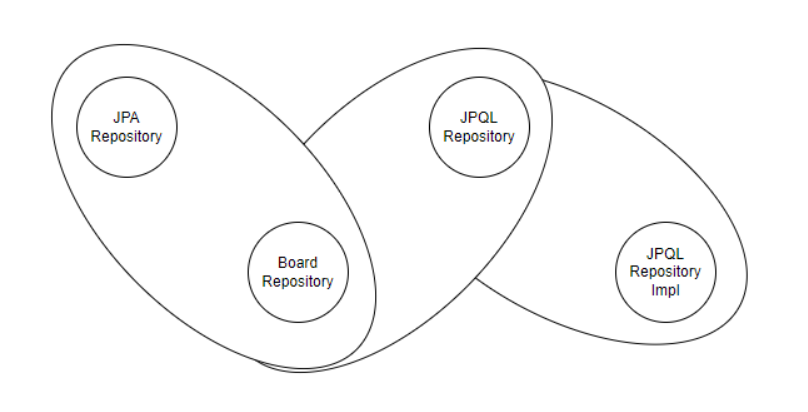
위와 같이 구현하게 되면 사진과 같은 구조를 가지게된다.
즉, BoardRepository를 DI 해주면 상속한 부모의 메서드를 사용할 수 있게되고
부모의 메서드는 추상 메서드로 구현되어 있으므로
추상 메서드를 실제 메서드로 만든 Impl class 내부의 로직을 동적 바인딩하여 실행하는 것이다.
BoardRepository만으로 Jpa의 메서드도 사용하고, Jpql의 메서드도 사용할 수 있다.
Spring Data JPA - Reference Documentation
Example 109. Using @Transactional at query methods @Transactional(readOnly = true) interface UserRepository extends JpaRepository { List findByLastname(String lastname); @Modifying @Transactional @Query("delete from User u where u.active = false") void del
docs.spring.io
다시 JpqlRepository의 내부를 살표보자.
JpqlRepository에서는 EntityManager를 사용해서 쿼리를 직접 짤 것이다.
여기는 트랜잭션을 걸어줄 필요도 없다.
JPA를 이용하면 DB에 있는 데이터를 엔티티로 받아준다.
EntityManager의 createQuery를 사용할 때도 마찬가지로
hibernate에서 생성된 Bean을 대상으로 list를 불러오기 때문에 DB의 테이블과 똑같은 모양과 타입으로 받아준다.
createQuery를 사용할 거면 JPARepository 사용하는 게 더 나음..
createQuery가 아닌 createNativeQuery를 사용하면 내 마음대로 쿼리를 짜서 받을 수 있다.
PrepareStatement와 같은 것이다.
createNativeQuery가 리턴해주는 Query를 버퍼로 전송하는 게 getSingleResult이다.
쿼리의 결과로 리턴된 Object가 result인데 이게 자바 오브젝트로 들어오는 게 아니라
Queue와 같은 원통에 콤마로 구분되어 통째로 스트링으로 들어온다.
이 result의 타입을 아직 모르기 때문에 Object의 배열로 받는데
콤마를 기준으로 배열에 착착 들어가는 것이다.
PrepareStatement는 rs.getString, getInt로 받을 수 있었는데
얘는 인덱스 값으로 순서대로 받아야 한다. 더 안좋다.
결과를 오브젝트에 매핑을 해주지 않기 때문에 Object[ ] 타입으로 바꿔 받아서
콤마로 섹터를 나눠 하나씩 캐스팅하여 받아줘야 하는 것이다.
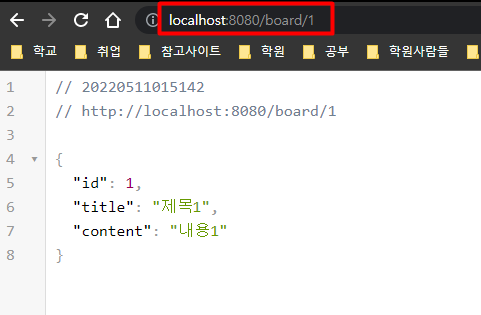
public BoardDetailRespDto mFindDetail(Integer id) {
String sql = "SELECT b.*, true FROM board b WHERE id = ?";
// 상세보기에 좋아요 하는지 안하는지 정보를 줘야함
Query query = em.createNativeQuery(sql)
.setParameter(1, id);
// Object 타입이기 때문에 하나씩 꺼내줘야함
Object[] result = (Object[]) query.getSingleResult(); // 데이터 한 건 리턴
Integer boardId = (Integer) result[0];
String title = (String) result[1];
String content = (String) result[2];
Boolean isLove = (Boolean) result[3];
BoardDetailRespDto dto = new BoardDetailRespDto(boardId, title, content, isLove);
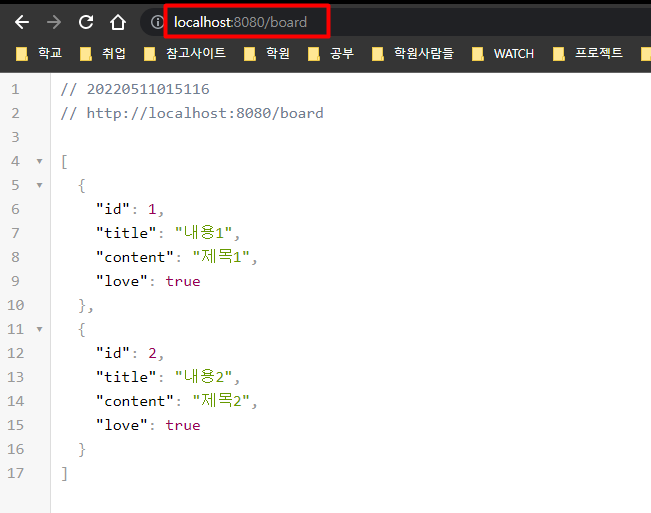
return dto; // 1, 제목1, 내용1, true
}package site.metacoding.entitytest.web.dto;
import lombok.AllArgsConstructor;
import lombok.Data;
import lombok.NoArgsConstructor;
@AllArgsConstructor
@NoArgsConstructor
@Data
public class BoardDetailRespDto { // 엔티티를 리턴하지 않기 위해 dto 생성
// private Board board; // 이렇게 넣으면 안된다. 결국 엔티티를 넣는거잖아
private Integer id;
private String title;
private String content;
private boolean isLove; // Board 엔티티를 넣지않고 dto로 만드니까 isLove 추가 가능
}
Board 엔티티를 넣는 게 아니라
Board 엔티티와 내부가 똑같이 생긴 Dto를 만들어 isLove를 추가해준 것이다.
만약 dto에 user 오브젝트가 필요하다면
내부 클래스에서 user 오브젝트와 내부가 동일한 dto를 새로 만들어준다.
내부 클래스로 만드는 이유는 다른 데서 사용할 일 없이 Dto에서만 사용하기 때문이다.
@AllArgsConstructor
@NoArgsConstructor
@Data
public class BoardDetailRespDto { // 엔티티를 리턴하지 않기 위해 dto 생성
    private Integer id;
    private String title;
    private String content;
    private boolean isLove; // Board 엔티티를 넣지않고 dto로 만드니까 isLove 추가 가능

    private UserDto user;

    class UserDto {
    	private Integer id;
    	private String username;
    	private String password;
    }
}
3. Service
서비스 코드를 만들어보자.
서비스에서 두 개의 repository를 의존하고 있는데
두 repository를 하나로 합쳐서 사용하면 편하겠다 ㅜㅜ
@RequiredArgsConstructor
@Service
public class BoardService {
    private final BoardRepository boardRepository; // API (JPA)
    private final BoardImplRepository boardImplRepository; // JPQL

    public BoardRespDto 상세보기(Integer id) {
        Board boardEntity = boardRepository.findById(id).get();

        BoardRespDto dto = new BoardRespDto( // 영속화된거 아님
                boardEntity.getId(),
                boardEntity.getTitle(),
                boardEntity.getContent());

        // Hibernate.initialize(boardEntity); // 미리 LAZY loading = open-in-view 의미 없음

        return dto; // lazy loading 발생 안함 : 서비스단에서 필요한 데이터를 다 만들어서 가져감 (비영속 상태로!!)
    }

    public BoardDetailRespDto 좋아요포함상세보기(Integer id) {
        return boardImplRepository.mFindDetail(id);
    }
}
package site.metacoding.entitytest.web.dto;
import lombok.AllArgsConstructor;
import lombok.Data;
import lombok.NoArgsConstructor;
@NoArgsConstructor
@AllArgsConstructor
@Data
public class BoardRespDto { // Board와 내부 동일
private Integer id;
private String title;
private String content;
}
서비스에서도 Board 엔티티를 리턴해주면 컨트롤러에서 Lazy loading이 발생하기 때문에
BoardRespDto를 만들어서 얘를 리턴해주자.
4. ApiController
@RequiredArgsConstructor
@RestController
public class BoardApiController {
    private final BoardService boardService;

    @GetMapping("/board/{id}")
    public ResponseEntity<?> 상세보기(@PathVariable Integer id) {
        BoardRespDto dto = boardService.상세보기(id);
        return new ResponseEntity<>(dto, HttpStatus.OK);
    }

    @GetMapping("/board/{id}/love")
    public ResponseEntity<?> 좋아요포함상세보기(@PathVariable Integer id) {
        BoardDetailRespDto dto = boardService.좋아요포함상세보기(id);
        return new ResponseEntity<>(dto, HttpStatus.OK);
    }
}
여기까지 잘 실행되는지 테스트해보자.
board 데이터를 insert 해야겠다.
h2 데이터 베이스는 접속할 때마다 데이터를 다시 넣어줘야 한다.
DB initialized 해주자.
메인 파일에 초기화 메서드를 하나 만들어주자.
CommandLineRunner는 인터페이스인데 run이라는 메서드를 가지고 있다.
리턴 타입이 인터페이스이기 때문에 익명 클래스로 new 하여 리턴해줘야 한다.
CommandLineRunner를 쓰면 매개변수에 BoardRepository라고 적어만두면
IoC 컨테이너에 있는 빈을 들고 온다. 문법이다.
// Bean이 메모리에 올려줌. 실행시점은 서버 최초 시작 시 한번
@Bean // IoC 컨테이너에 등록
public CommandLineRunner initData(BoardRepository boardRepository) {

	return new CommandLineRunner() {

		@Override
		public void run(String... args) throws Exception {
			List<Board> boards = new ArrayList<>();

			for (int i = 1; i < 3; i++) {
				Board board = new Board();
				board.setTitle("제목" + i);
				board.setContent("내용" + i);
				boards.add(board);
			}

			boardRepository.saveAll(boards);
		}

	};
}
어차피 메서드가 하나라면 화살표 함수를 사용하자.
// Bean이 메모리에 올려줌. 실행시점은 서버 최초 시작 시 한번
@Bean // IoC 컨테이너에 등록
public CommandLineRunner initData(BoardRepository boardRepository) {

	return (args) -> {

		List<Board> boards = new ArrayList<>();

		for (int i = 1; i < 3; i++) {
			Board board = new Board();
			board.setTitle("제목" + i);
			board.setContent("내용" + i);
			boards.add(board);
		}

		boardRepository.saveAll(boards);
	};
}
한건만 가져오는 게 아닌 여러 건을 가져올 때 샘플 코드도 만들어보자.
repository
public List<BoardDetailRespDto> mFindAll() {
    List<BoardDetailRespDto> dtos = new ArrayList<>();

    String sql = "SELECT b.*, true FROM board b";
    // 상세보기에 좋아요 하는지 안하는지 정보를 줘야함
    Query query = em.createNativeQuery(sql);

    // Object 타입이기 때문에 하나씩 꺼내줘야함
    List<Object[]> results = (List<Object[]>) query.getResultList(); // 데이터 여러건 리턴

    for (Object[] result : results) {
        Integer boardId = (Integer) result[0];
        String title = (String) result[1];
        String content = (String) result[2];
        Boolean isLove = (Boolean) result[3];

        BoardDetailRespDto dto = new BoardDetailRespDto(boardId, title, content, isLove);
        dtos.add(dto);
    }

    return dtos; // 1, 제목1, 내용1, true
}
service
public List<BoardDetailRespDto> 전체보기() {
    return boardImplRepository.mFindAll();
}
controller
@GetMapping("/board")
public ResponseEntity<?> 전체보기() {
    List<BoardDetailRespDto> dtos = boardService.전체보기();
    return new ResponseEntity<>(dtos, HttpStatus.OK);
}
createNativeQuery의 결과를 직접 매핑해주기 불편하기 때문에 QLRM 라이브러리를 사용해보자.
https://mvnrepository.com/artifact/ch.simas.qlrm/qlrm/1.7.1
Maven Repository: ch.simas.qlrm » qlrm » 1.7.1
QLRM - Query Langugage Result Mapper ch.simas.qlrm qlrm 1.7.1 // https://mvnrepository.com/artifact/ch.simas.qlrm/qlrm implementation group: 'ch.simas.qlrm', name: 'qlrm', version: '1.7.1' // https://mvnrepository.com/artifact/ch.simas.qlrm/qlrm implementa
mvnrepository.com
build.gradle에 dependencies에 추가해주자.
// https://mvnrepository.com/artifact/ch.simas.qlrm/qlrm
implementation group: 'ch.simas.qlrm', name: 'qlrm', version: '1.7.1'
QLRM 라이브러리가 제공해주는 JpaResultMapper라는 객체를 하나 만들어주면
Object 배열을 직접 매핑해줄 필요가 없다.
mapper.list에 ① 쿼리를 넣고, ② 받고 싶은 Dto 클래스 타입을 넣어주면 바로 매핑해준다.
JPQL의 결과를 자동으로 매핑해주는 것이다.
// QLRM 라이브러리
public List<BoardDetailRespDto> mFindAllQLRM() {

    String sql = "SELECT b.*, true FROM board b";
    // 상세보기에 좋아요 하는지 안하는지 정보를 줘야함
    Query query = em.createNativeQuery(sql);

    JpaResultMapper mapper = new JpaResultMapper();
    List<BoardDetailRespDto> dtos = mapper.list(query, BoardDetailRespDto.class);

    return dtos; // 1, 제목1, 내용1, true
}
서비스에서 우리가 직접 Object 배열을 매핑해준 mFindAll을 호출해도 되고,
QLRM을 사용한 mFindQLRM을 호출해도 된다.
public List<BoardDetailRespDto> 전체보기() {
    return boardImplRepository.mFindAll();
    // return boardImplRepository.mFindAllQLRM();
}
전체보기 ▼
1번 board 상세보기 ▼
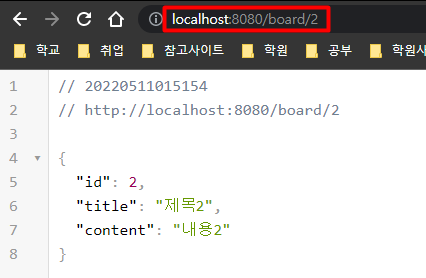
2번 board 상세보기 ▼
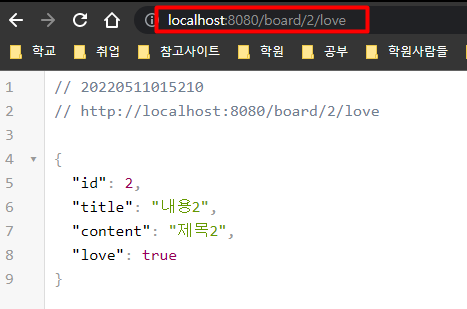
2번 board 좋아요 포함 상세보기 ▼
[출처]
https://cafe.naver.com/metacoding
메타코딩 : 네이버 카페
코린이들의 궁금증
cafe.naver.com
메타 코딩 유튜브
https://www.youtube.com/c/%EB%A9%94%ED%83%80%EC%BD%94%EB%94%A9
메타코딩
문의사항 : getinthere@naver.com 인스타그램 : https://www.instagram.com/meta4pm 깃헙 : https://github.com/codingspecialist 유료강좌 : https://www.easyupclass.com
www.youtube.com